Checkout SlayerLabs.com!
Networks Engineered to Exploit.
- Windows/UNIX - Domains/Subnets - Initial/Post/Lateral - Low Cost VPN Ranges -
CALDERA
MITRA CALDERA is a free Automated Adversary Emulation System used to test endpoint security and assess network security posture against common post-exploitation techniques. CALDERA uses the MITRE ATT&CK model to replicate adversary actions.
This post will be a supplementary guide on how to install and configure CALDERA onto a simple lab network. It’ll also go over how to run your first operation and include some basic IR & Discovery of malicious artifacts.
A few sources:
The GitHub repo is very thorough - excellent job by MITRE contributors - be sure to use MITRE’s documentation as well.
What’s Needed?
CALDERA uses agents deployed on targets/victims to communicate to the CALDERA Server, and RAT’s to execute the desired payload. The CALDERA Server decides the next best action to take based off current knowledge. It uses Python3 as the web service and MongoDB as the DB.
CALDERA Server can be installed on Windows or Linux. This guide will go over server installation on Debian Stretch (Xfce) to include 4 Windows hosts as the target’s where the agents will be configured. Microsoft OS’s include Windows 10 and Windows Server 2012.
Requirements
You should have a minimum of 1 Domain Controller & 2 Windows hosts (server 2008R2 or Win7 64-bit and above). Also it’s recommended to not have any more than 20 hosts in an operation.
Server Install
Install Python3, pip3 and upgrade setuptools package. Make sure you define python3 AND pip3 when installing, configuring and running CALDERA.
apt-get install python3-dev
apt install python3-pip
pip3 install --upgrade setuptools
Install CALDERA wherever you’d like - in this example it’s in /opt
cd /opt; git clone https://github.com/mitre/caldera.git
cd /opt/caldera/caldera
pip3 install -r requirements.txt
Install MongoDB 3.0 or later.
apt-get install mongodb
MongoDB must be configured to use a replication set - add the following line to /etc/mongodb.conf
replSet = caldera
And start mongodb.
systemctl start mongodb
The Server will also need CraterMain.exe installed and placed in /opt/caldera/dep/crater/crater/CraterMain.exe Go here to download CraterMain.exe. Make sure to rename the exe to CraterMain.exe if not already.
Fire it up
To start CALDERA Server, you’ll need to execute the caldera.py script in /opt/caldera/caldera/ - make sure you’re executing with Python3.
python3 /opt/caldera/caldera/caldera.py
An OpenSSL prompt may appear on first startup.
- Now go to the web interface in your web browser:
https://localhost:8888 - Use credentials: admin:caldera
- Change password for added security
The Server is now complete, next up is Agent install.
Agent Install
The CALDERA agent will need to be installed on every host target that’ll be participating in the operation. There are only a few steps including:
- Create a CALDERA folder
- Move two files over (exe and yml)
- Run the exe
I’ll run through each of these in detail, along with additional troubleshooting steps I had to perform.
If you’re on a new lab build and your Windows boxes aren’t fully updated (like mine) you’ll need to update Visual C++ Redistributable for Visual Studios 2015 AND possibly install .Net Framework 3.5. I’d recommend installing both if you have completely fresh installs of Windows. If not you’ll run into errors when executing your first operation.
If your lab is not able to access the internet directly, installing .Net Framework 3.5 can be a annoying. I’ll quickly go over this in case anyone runs into the same issue. If this doesn’t pertain to you, feel free to move on to the next step. If you want a more thorough guide see official Microsoft Documentation.
Offline .Net 3.5 install
- First, download the DotNetFx35Client offline installer and move to each of your agent machines. I’d recommend creating a lab network share to move all needed files to vs having to copy files to each box via RDP, etc.
- Have the Windows install iso mounted to any drive. In some virtual environments this iso may be mounted automatically at boot.
- Open cmd as admin, then execute the following syntax - assuming D: is where the windows installer disk/iso is.
DISM /Online /Enable-Feature /FeatureName:NetFx3 /All /LimitAccess /Source:d:\sources\sxs
- Once complete, right-click » run the DotNetFx35Client as admin. Done.
Moving on
If you haven’t already, download the caldera agent and if needed, throw into a lab network share for ease of access. Once downloaded create a folder and place the exe in it, ex: C:\ProgramFiles\cagent\cagent.exe
In the same folder get the servers conf.yml file and place in here. Each CALDERA Server instance is unique, so make sure to get the yml file on each Server build. Location:
https://my-caldera-server:8888/conf.yml
Download and put this in your folder, ex: C:\ProgramFiles\cagent\conf.yml Also make sure the address pulled into the conf file correctly. Edit with notepad and make sure the url_root is your CALDERA Server IP on port 8888.
Open cmd as admin, navigate to the directory of your cagent.exe, and execute:
cagent.exe --startup auto install
cagent.exe start
Lastly, punch a few holes in the firewall to allow CALDERA to fully operate.
powershell -command Enable-NetFirewallRule -DisplayName "'File and Printer Sharing (SMB-In)'"
powershell -command Enable-NetFirewallRule -DisplayName "'Remote Scheduled Tasks Management (RPC)'"
All done!
Verify Install
Login to your CALDERA Server web GUI and go to Debug » Connected Agents. You should see all the deployed agents populate here.

If you aren’t seeing anything be sure the agents are running properly. Can you ping the Server from your targets? Is the cagent service running? How about the conf.yml file, any discrepancies?
To verify the agent is running correctly, run: tasklist /svc or sc.exe query cagent on each target. If the conf.yml is incorrect, change, and restart cagent server.
Prep for an Op
To keep things simple, there are only three sections to configure before running your first operation - Network, Threat and Operation.
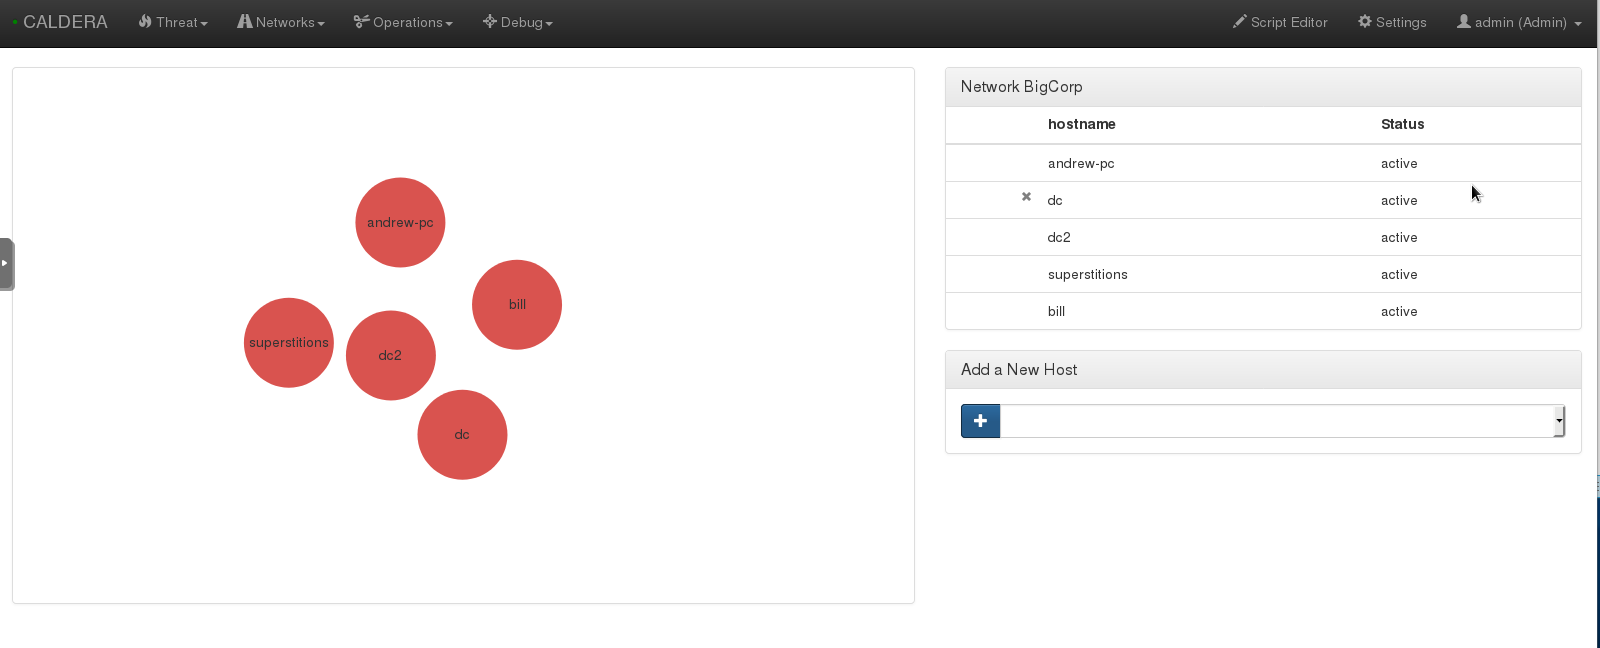
NETWORK. First add your network by going to Network » Create Network. Select which machines you’d like to add as the targets and name the network what ever you’d like. If you have another DC with hosts, you can add those on the following page.
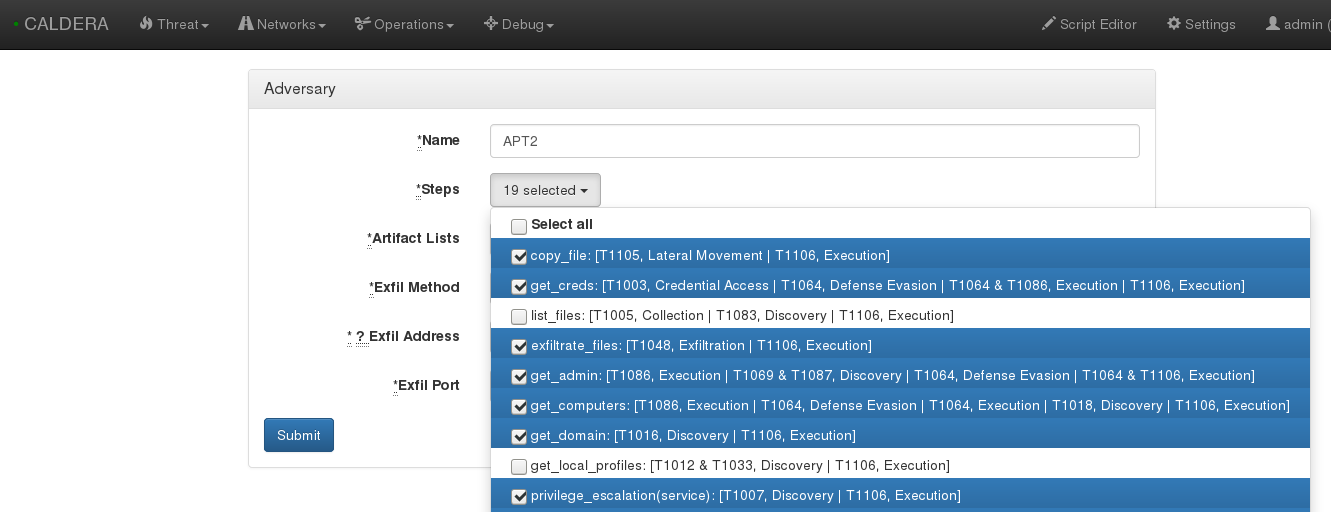
THREAT. The threats section includes emulated adversaries. There are a few pre-built, but feel free to add any additional APT’s to the list.
OPERATION. For your first operation, I’d recommend disabling Windows Defender to make sure everything’s working properly. Name how ever you’d like, add a starting host and set the user to SYSTEM. Add the start method to Bootstrap RAT. Be sure to read up on each option via the official documentation.
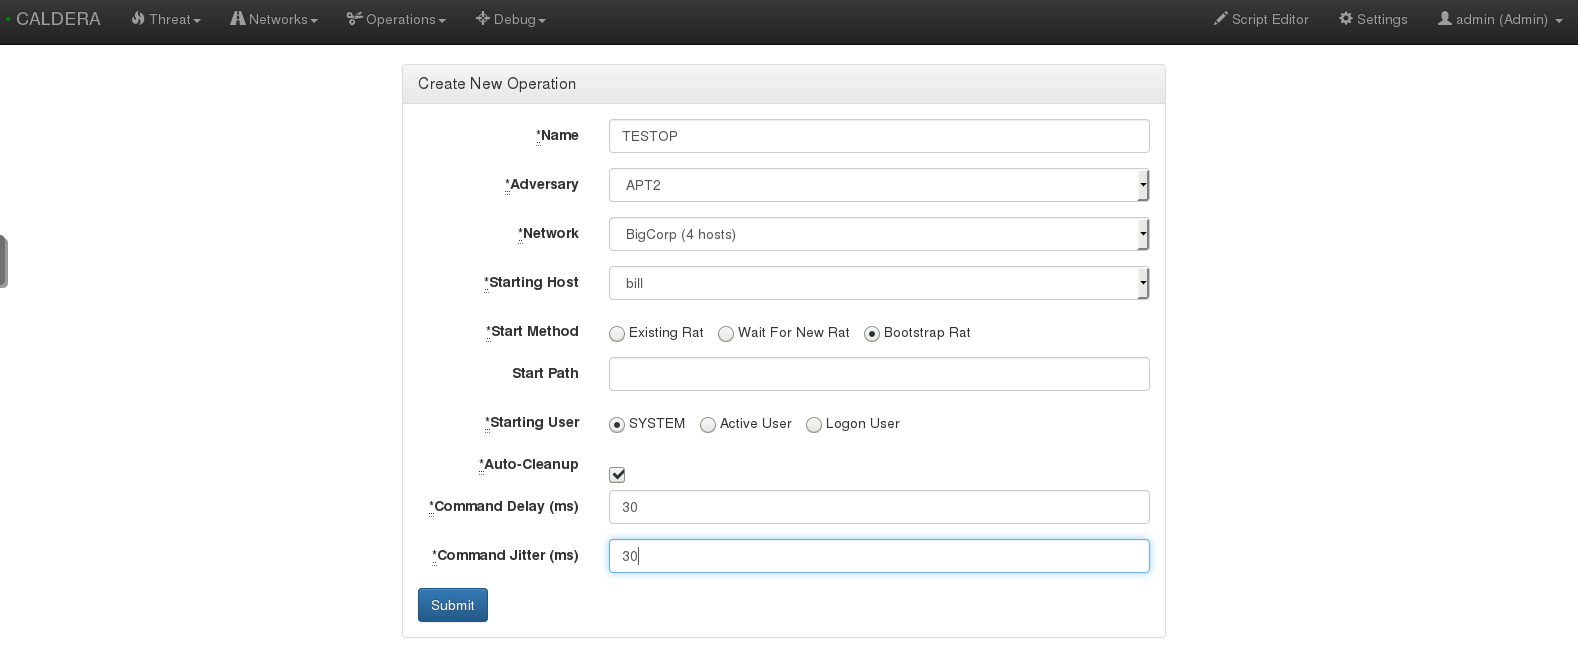
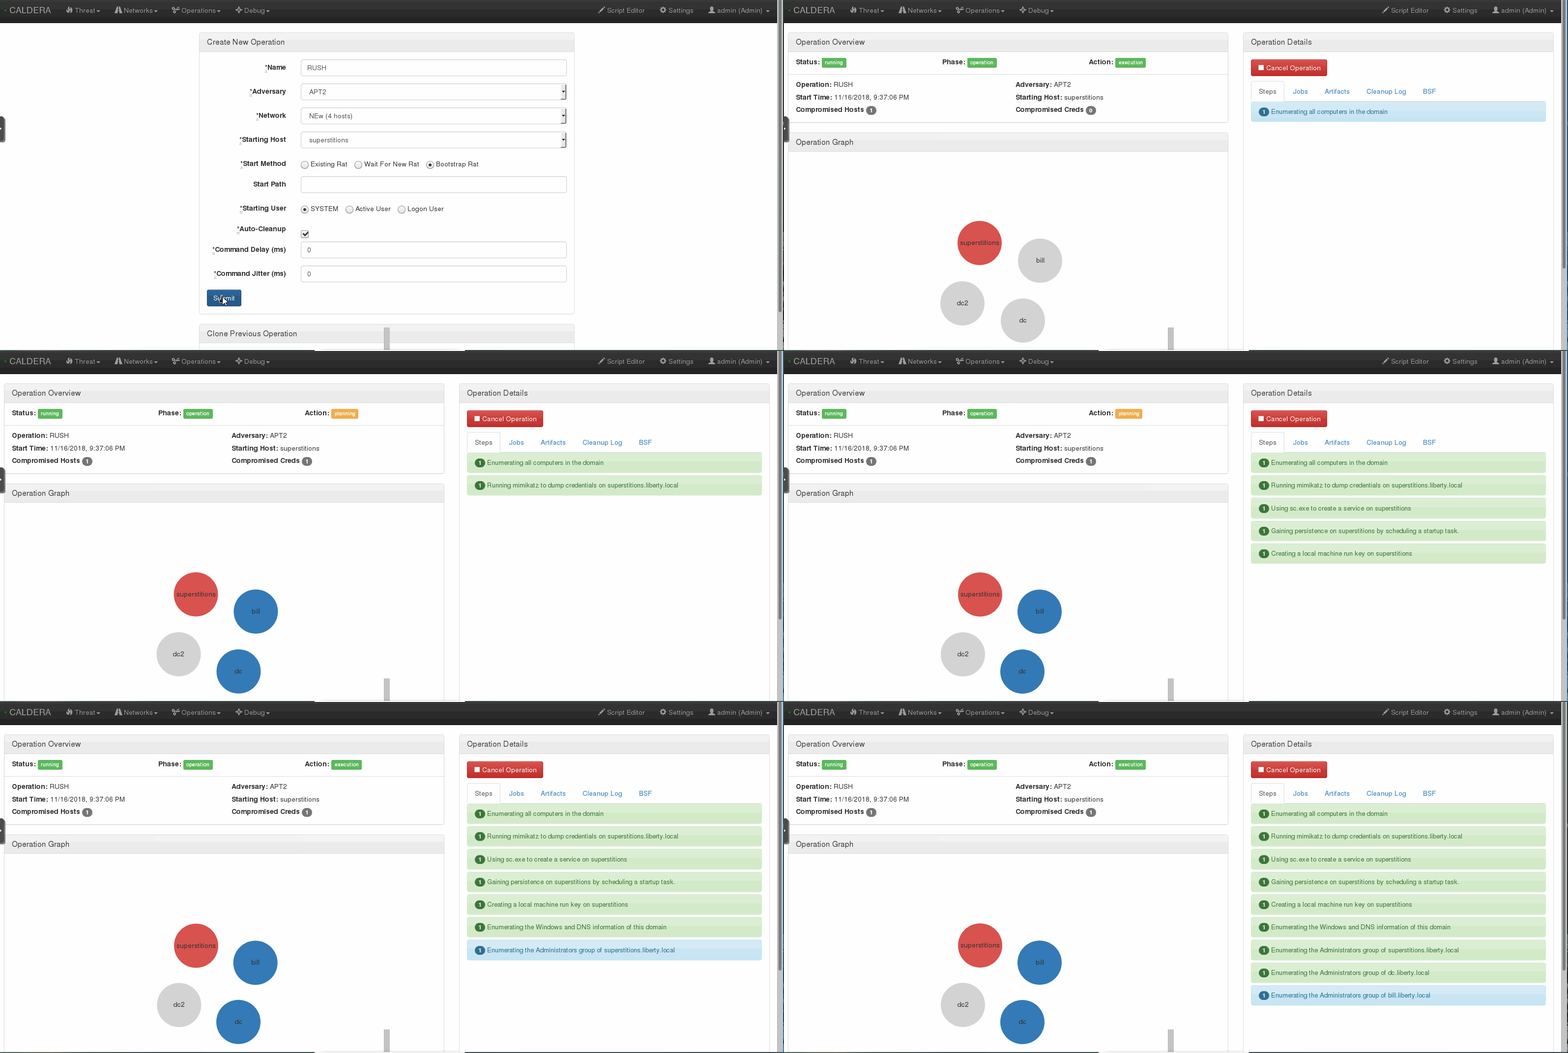
You can set the delay and jitter to emulate real adversaries, although this is not necessary for your first operation. Once you click Submit the emulation will execute.
Incident Response
Not only can you use CALDERA to test defensive security software, but you can also use it to practice forensics, threat hunting or incident response. If you de-selected auto-cleanup, you’ll have some nifty artifacts to investigate. I’ll go over a few of the basics.
Scheduled Tasks
Scheduled Task - An attacker may set a scheduled task to maintain persistence by executing a beacon, backdoor, etc at a given date and time. In this example it seems a task caled calder4eva was created.

The Windows Task Scheduler GUI can be opened by running taskschd.msc. This will shine light into each tasks triggers, commands, actions and more. Also, if the target has file and printer sharing enabled, you can add tasks remotely. You can quickly check scheduled tasks, by using the schtasks command.

Run Keys
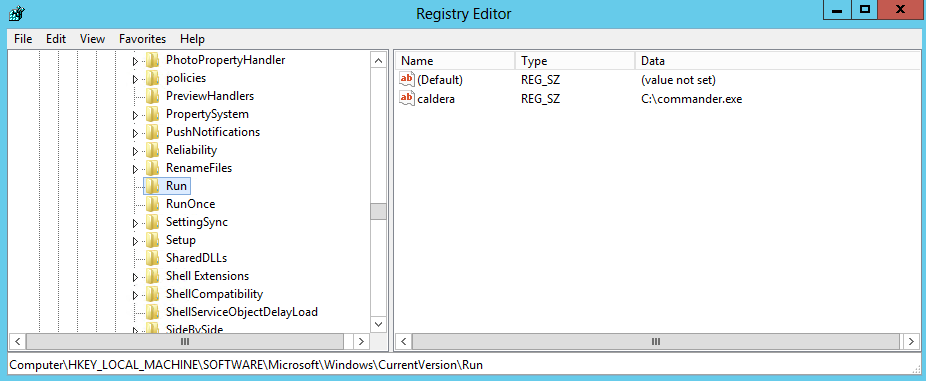
Run Keys - Entries placed in these locations will cause the referenced items to execute when the user logs in. There are multiple locations an attacker may use to utilize this persistence method, including HKLM, HKCU and HKU registry Run keys. Included in Sysinternals is autoruns, which is an additional tool you can use to find malicious programs executing on startup.

To view this, we can use reg query, or simply open the registry via regedit.exe. Be sure to check all of the run key locatons for potential implants.
New Services
New Service - Services are executed as SYSTEM on startup (if enabled), so it’s common for an attacker to create a bogus service containing a malicious payload. In this example it seems the new service of caldera executes commander.exe which is the built-in RAT.

Sysinternals contains Process Explorer, which is an excellent tool to investigate running process and services. Otherwise you can check via the command line using the built-in Windows binary sc.exe.

Summary
This is an excellent application for a variety of security needs. There aren’t many systems available that can emulate adversary actions, which can make practicing or training on Defensive techniques a challenge.
To gain offensive security skills, you can download one of the hundreds of freely avialable CTF’s or Boot2Roots - not to mention all the sites like hackthebox, overthewire, etc. It’s good to finally have a counterpart to all of these.
Keep in mind, CALDERA can also be used to test security software. How will that fancy new HIPS protect against known techniques of cyber criminals?